NGINX被广泛应用于网站内容缓存,小到个人网站,大到一些世界大型内容分发网站(CDNs),例如 MaxCDN 和 CloudFlare。微程序缓存通过将动态、非个人化的内容缓存很短的时间,能有效加速这些内容的传递。
在本文中,笔者将展示如何利用微程序缓存技术将一个基于 WordPress 的应用程序最高提速400倍。
利用Nginx fastcgi_cache Microcaching微缓存,直接使用Nginx为页面生成缓存,效率比使用PHP缓存插件要高得多,特别适合小配置的VPS上使用。
缓存能够一举两得:通过更快地传递内容,缓存可以改善网站性能,同时减轻源服务器的负担。缓存的效率取决于内容的缓存度。这些内容可以存储多长时间,如何检查更新,相同的缓存内容可以发给多少用户?
降低SSL延迟
HTTP耗时 = TCP握手
HTTPs耗时 = TCP握手 + SSL握手
所以,HTTPs肯定比HTTP耗时,这就叫SSL延迟。
命令行工具curl有一个w参数,可以用来测量TCP握手和SSL握手的具体耗时,以访问支付宝为例。
curl -w "TCP handshake: %{time_connect}, SSL handshake: %{time_appconnect}\n" -so /dev/null https://jiemahao.com
上面命令中的w参数表示指定输出格式,time_connect变量表示TCP握手的耗时,time_appconnect变量表示SSL握手的耗时,s参数和o参数用来关闭标准输出。
结果:TCP handshake: 0.342965, SSL handshake: 0.367737
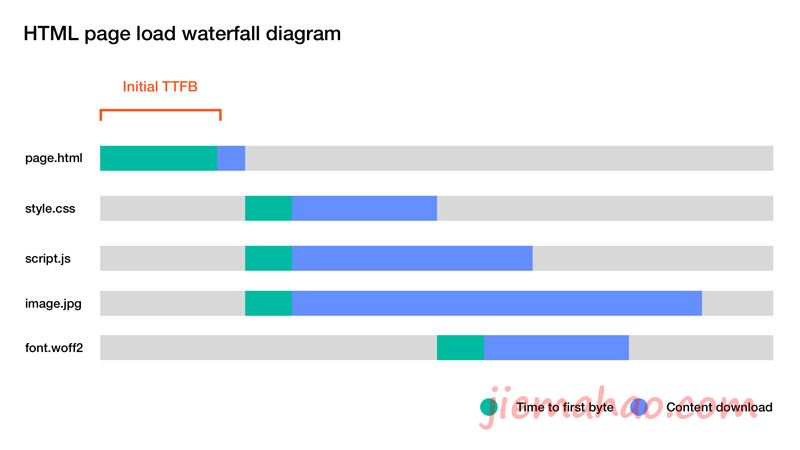
降低 TTFB 或者首字节时间
降低 TTFB 或者首字节时间是网页优化中最重要的优化之一。TTFB 是指后端处理请求所需的时间。这很重要,因为初始的 TTFB 直接影响客户端接收初始 HTML 文档并解析后继续获取其他资源的时间。由于初始请求会阻止获取页面上的所有其他资源,因此最小化此延迟至关重要。
在处理动态数据库驱动的网站时,您只能在从数据库和外部 API 获取所有必要数据,然后使用诸如 PHP、Ruby 或 Node 等编程语言构建页面模板的过程中进行有限的优化。这就是为什么静态网站如此吸引人的原因:您可以使用 Web 服务器简单地提供静态 HTML 文档,而且延迟很小。
通过全页面缓存,您可以在动态、数据库驱动的网站中获得相同的速度优势。不是每次有新请求时都使用后端语言处理请求,而是将静态 HTML 或 JSON 响应保存到文件系统中,并从那里为后续请求提供服务。通常响应会被保存几分钟。只有当缓存过期时,才会再次向后端服务器发出请求,然后为用户的后续请求缓存响应。
在对WordPress进行优化时,关注太大页面缓存。之前使用过的缓存插件包括但不限于WordPress Super Cache、WP Fastest Cache、W3 Total Cache、cos-html-cache、Cachify等。总的来说,安装缓存插件后能够有效提高网站的速度。
但这也导致一些问题,因为现在向用户提供的是旧的内容。如果您在数据库中更新内容,则用户可能需要等待几分钟才能看到更新的内容。我们可以通过使用微缓存来解决此问题:不是缓存几分钟,而是缓存几秒钟。这样,用户几乎可以立即获得新鲜的内容。
当需要缓存时,许多人会想到使用Varnish。然而,Varnish是一个庞大的工具,配置起来有些困难。此外,Varnish不支持HTTPS。在许多情况下,您需要运行后端服务器,例如Nginx,然后是Varnish,最后再是Nginx来进行SSL终止。这会大大增加服务器设置的复杂性。
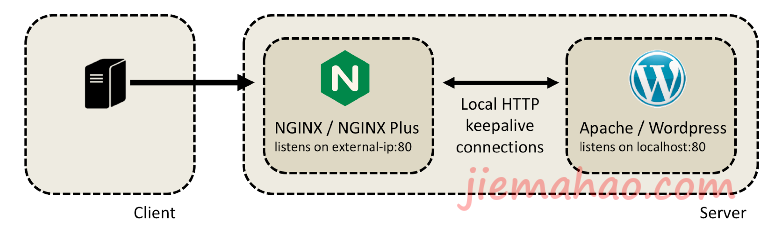
除了作为HTTP服务器外,Nginx还是一个强大的缓存工具,可以替代Varnish使用。Nginx支持FastCGI缓存,主要用于PHP,以及支持使用其自己的Web服务器的语言的HTTP缓存,例如Node。在本示例中,我们使用了FastCGI缓存,但您可以通过将fastcgi_前缀替换为proxy_,使用相同的配置进行HTTP缓存。
我测试的是一个基本的 WordPress 安装首页,没有使用任何缓存,使用 ApacheBench 进行 1000 个请求和 10 个请求并发。WordPress 安装在一台 DigitalOcean droplet 上,该 droplet 配置为 512MB 的内存,运行 Ubuntu 16.04 操作系统和 PHP 7。下面是我使用的 Nginx 配置。
server { listen 80 default_server; listen [::]:80 default_server ipv6only=on; root /var/www/html; index index.php index.html index.htm; server_name example.com; location / { try_files $uri $uri/ /index.php$is_args$args; } error_page 404 /404.html; error_page 500 502 503 504 /50x.html; location = /50x.html { root /usr/share/nginx/html; } location ~ \.php$ { include snippets/fastcgi-php.conf; fastcgi_pass unix:/run/php/php7.0-fpm.sock; }}
现在,如果我们可以添加以下配置来启用基本的 FastCGI 缓存。请确保缓存文件夹可以被 Web 服务器进程写入。
# Ignore cache control headers from upstream, don't enable this if you plan to control caching per-page from your applicationfastcgi_ignore_headers Cache-Control Expires Set-Cookie;# Specify cache path, cache memory zone, how long until old data gets purged from the cache and maximum cache sizefastcgi_cache_path /etc/nginx/cache levels=1:2 keys_zone=microcache:100m inactive=1y max_size=100m;# A key that is used to uniquely identify a cached pagefastcgi_cache_key "$scheme://$host$request_method$request_uri";server { listen 80 default_server; listen [::]:80 default_server ipv6only=on; root /var/www/html; index index.php index.html index.htm; server_name example.com; location / { #try_files $uri $uri/ =404; try_files $uri $uri/ /index.php$is_args$args; } error_page 404 /404.html; error_page 500 502 503 504 /50x.html; location = /50x.html { root /usr/share/nginx/html; } location ~ \.php$ { include snippets/fastcgi-php.conf; fastcgi_pass unix:/run/php/php7.0-fpm.sock; } # WordPress specific settings, don't cache logged in users or admin pages set $no_cache 0; if ( $http_cookie ~* "comment_author_|wordpress_(?!test_cookie)|wp-postpass_" ) { set $no_cache 1; } if ($request_uri ~* "/(wp-admin/|wp-login.php)") { set $no_cache 1; } # Don't cache or serve pages specified above fastcgi_cache_bypass $no_cache; fastcgi_no_cache $no_cache; # Select which cache to use fastcgi_cache microcache; # Cache successful responses for one second, you could also cache redirects here by adding status code 302! fastcgi_cache_valid any 1s; # Show cache status in HTTP headers, useful for debugging add_header X-Cache $upstream_cache_status;}
当我们运行benchmark压力测试时,这些是数据:
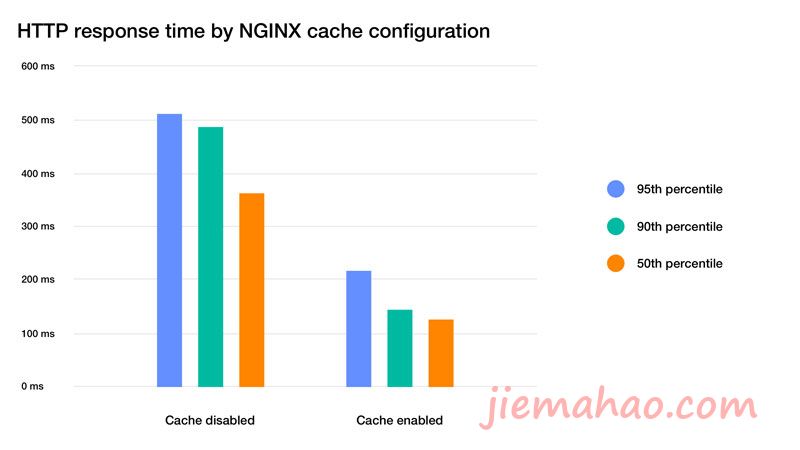
如上所示,中位数(50%分位)响应时间快了近3倍。但是,第95个百分位响应时间要慢得多。这是因为缓存过期后,有许多请求要到后端处理,相比于从缓存中获取数据,这些请求的处理速度要慢得多。这就是所谓的缓存未命中(cache MISS),与从缓存中获取数据的缓存命中(cache HIT)相对比。
为了防止这种情况发生,我们可以添加以下几行代码到配置文件中,让 Nginx 锁定缓存,这样只有一个请求会转到后端,其他请求则直接从缓存中获取。
fastcgi_cache_lock on;fastcgi_cache_valid any 1s;fastcgi_cache_use_stale updating;
再次测试如下
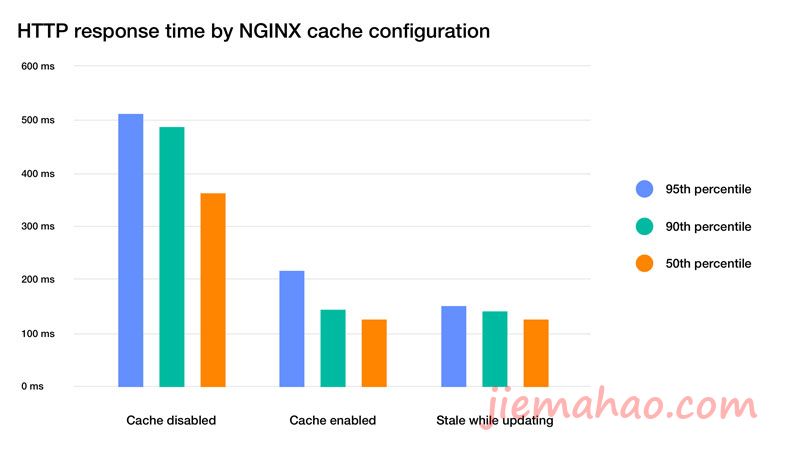
正如我们所看到的,这相对于仅启用缓存来说是一个巨大的改进。
但是第一个请求怎么办?当缓存过期后,其他请求会从缓存中提供旧的内容,但是在缓存过期后的第一个请求仍然很慢,因为它被后端处理所阻塞。我们可以通过使用“过期而重新验证”策略进行最后一次配置更改来防止这种情况发生。
笔者想要的策略很清晰:需要在确保缓存内容最新的情况下,尽可能少地向上游源服务器转发请求。在缓存内容不断更新的前提下,笔者愿意从缓存获取旧的(延后1到2秒)响应。要实现这一目标,需要添加两条指令:
proxy_cache_lock ——限制填充缓存的并发尝试数量,这样当一条缓存入口被创建后,对该资源的请求将会在 NGINX 中排队。
proxy_cache_use_stale ——配置 NGINX,使它提供旧的(最近缓存的)内容,同时更新缓存入口。
这意味着当缓存过期时,缓存中的旧文档将为所有后续请求提供服务,并且缓存在后台更新。当缓存已更新时,请求将从相对新鲜的缓存中提供服务。这样,服务器上的请求都不会真正到达后端,确保了最佳性能。
请注意,fastcgi_cache_background_update 仅受 Nginx 1.11.10 以上的支持,因此如果您的服务器设置较旧,则应考虑更新到最新版本以利用此设置。
fastcgi_cache_lock on;fastcgi_cache_valid any 1s;fastcgi_cache_use_stale updating;fastcgi_cache_background_update on;
以下是这些设置与之前设置的比较:

现在所有的请求都是从缓存中服务的:没有请求实际到达后端服务器。内容仍然相对新鲜,一秒钟后下一个请求将在后端处理完成后变为新鲜的。如图所示,几乎所有的请求都同样快。最终,这是一个小的优化,但如果页面生成需要很长时间,它可以消除任何异常值。
请注意,即使您正在使用 CDN 将静态内容放置在靠近用户的位置,您仍然可以从微缓存中受益,因为大多数 CDN 不会缓存 HTML 文档,只会缓存静态资源,如图像、样式表和 JavaScript 文件。
那么,完整页面缓存有什么缺点吗?
完整页面缓存仅适用于静态网站,这些网站没有与特定用户相关的任何内容。一旦您的网站有登录页面和用户名称在右上角,缓存就几乎变得不可能,因为您需要为每个单独的用户设置单独的缓存。简单但性能较差的解决方案是根据 cookie 禁用已登录用户的缓存。
如果你想让已登录用户获得相同的性能优势,你可以考虑将对所有用户相同的内容从完整页面缓存中提取,并使用像Vue或React这样的JavaScript框架,通过REST API在客户端呈现特定于用户的部分。
以下是测试使用的最终配置供参考:
# Ignore cache control headers from upstream, don't enable this if you plan to control caching per-page from your applicationfastcgi_ignore_headers Cache-Control Expires Set-Cookie;# Specify cache path, cache memory zone, how long until old data gets purged from the cache and maximum cache sizefastcgi_cache_path /etc/nginx/cache levels=1:2 keys_zone=microcache:100m inactive=1y max_size=100m;# A key that is used to uniquely identify a cached pagefastcgi_cache_key "$scheme://$host$request_method$request_uri";server { listen 80 default_server; listen [::]:80 default_server ipv6only=on; root /var/www/html; index index.php index.html index.htm; server_name example.com; location / { #try_files $uri $uri/ =404; try_files $uri $uri/ /index.php$is_args$args; } error_page 404 /404.html; error_page 500 502 503 504 /50x.html; location = /50x.html { root /usr/share/nginx/html; } location ~ \.php$ { include snippets/fastcgi-php.conf; fastcgi_pass unix:/run/php/php7.0-fpm.sock; } # WordPress specific settings, don't cache logged in users or admin pages set $no_cache 0; if ( $http_cookie ~* "comment_author_|wordpress_(?!test_cookie)|wp-postpass_" ) { set $no_cache 1; } if ($request_uri ~* "/(wp-admin/|wp-login.php)") { set $no_cache 1; } # Don't cache or serve pages specified above fastcgi_cache_bypass $no_cache; fastcgi_no_cache $no_cache; # Select which cache to use fastcgi_cache microcache; # Cache successful responses for one second, you could also cache redirects here by adding status code 302! fastcgi_cache_valid any 1s; fastcgi_cache_lock on; fastcgi_cache_use_stale updating; fastcgi_cache_background_update on; # Show cache status in HTTP headers, useful for debugging add_header X-Cache $upstream_cache_status;}
如果你是用军哥LNMP,那么 以下可以参考以下配置:
# Ignore cache control headers from upstream, don't enable this if you plan to control caching per-page from your applicationfastcgi_ignore_headers Cache-Control Expires Set-Cookie;# Specify cache path, cache memory zone, how long until old data gets purged from the cache and maximum cache sizefastcgi_cache_path /tmp/nginx-cache levels=1:2 keys_zone=microcache:999m inactive=1y max_size=999m;fastcgi_temp_path /tmp/nginx-cache/temp;# A key that is used to uniquely identify a cached pagefastcgi_cache_key "$scheme://$host$request_method$request_uri";server { listen 80; listen [::]:80; server_name jiemahao.com www.jiemahao.com; index index.html index.htm index.php default.html default.htm default.php; root /home/wwwroot/jiemahao.com; #include rewrite/wordpress.conf; #error_page 404 /404.html; # Deny access to PHP files in specific directory #location ~ /(wp-content|uploads|wp-includes|images)/.*\.php$ { deny all; } include enable-php.conf; location ~ .*\.(gif|jpg|jpeg|png|bmp|swf)$ { expires 30d; } location ~ .*\.(js|css)?$ { expires 12h; } location ~ /.well-known { allow all; } location ~ /\. { deny all; } location / { return 301 https://$host$request_uri; } access_log /home/wwwlogs/jiemahao.com.log; }server { listen 443 ssl http2; listen [::]:443 ssl http2; server_name jiemahao.com www.jiemahao.com; index index.html index.htm index.php default.html default.htm default.php; root /home/wwwroot/jiemahao.com; ssl_certificate /usr/local/nginx/conf/ssl/jiemahao.com/fullchain.cer; ssl_certificate_key /usr/local/nginx/conf/ssl/jiemahao.com/jiemahao.com.key; ssl_session_timeout 5m; ssl_protocols TLSv1 TLSv1.1 TLSv1.2 TLSv1.3; ssl_prefer_server_ciphers on; ssl_ciphers "TLS13-AES-256-GCM-SHA384:TLS13-CHACHA20-POLY1305-SHA256:TLS13-AES-128-GCM-SHA256:TLS13-AES-128-CCM-8-SHA256:TLS13-AES-128-CCM-SHA256:EECDH+CHACHA20:EECDH+CHACHA20-draft:EECDH+AES128:RSA+AES128:EECDH+AES256:RSA+AES256:EECDH+3DES:RSA+3DES:!MD5"; ssl_session_cache builtin:1000 shared:SSL:10m; # openssl dhparam -out /usr/local/nginx/conf/ssl/dhparam.pem 2048 ssl_dhparam /usr/local/nginx/conf/ssl/dhparam.pem; include rewrite/wordpress.conf; #error_page 404 /404.html; # Deny access to PHP files in specific directory #location ~ /(wp-content|uploads|wp-includes|images)/.*\.php$ { deny all; } include enable-php.conf;# WordPress specific settings, don't cache logged in users or admin pages set $no_cache 0; if ( $http_cookie ~* "comment_author_|wordpress_(?!test_cookie)|wp-postpass_" ) { set $no_cache 1; } if ($request_uri ~* "/(wp-admin/|wp-login.php)") { set $no_cache 1; } # Don't cache or serve pages specified above fastcgi_cache_bypass $no_cache; fastcgi_no_cache $no_cache; # Select which cache to use fastcgi_cache microcache; # Cache successful responses for one second, you could also cache redirects here by adding status code 302! fastcgi_cache_valid any 1s; fastcgi_cache_lock on; fastcgi_cache_use_stale updating; fastcgi_cache_background_update on; # Show cache status in HTTP headers, useful for debugging add_header X-Cache $upstream_cache_status; location ~ .*\.(gif|jpg|jpeg|png|bmp|swf)$ { expires 30d; } location ~ .*\.(js|css)?$ { expires 12h; } location ~ /.well-known { allow all; } location ~ /\. { deny all; } access_log /home/wwwlogs/jiemahao.com.log; }
动态内容的微程序缓存
微程序缓存是一种缓存技术,将内容缓存1秒左右很短的时间。这意味着网站更新会延迟不到1秒钟,这在很多情况下是可以接受的。
缓存对于网站性能的提升效果显著,不仅可以更快地传递内容,还可以减轻源服务器的负担。缓存的有效性取决于内容的缓存程度,包括缓存内容的存储时间、如何检查更新以及可以将相同的缓存内容提供给多少用户等因素。如果缓存的时间太短,那么每个请求都会访问后端服务器,而如果时间太长,缓存的内容可能已经过时。因此,找到一个适当的缓存时间是非常重要的。
为了防止缓存过期后后端服务器被过多请求打压,可以使用“微缓存”策略,即将内容存储在缓存中,以确保在给定时间内的任何请求都会获得同样的内容。这个时间段通常在1秒以内,可以通过配置Nginx服务器来实现。
如果您的网站需要登录功能,则缓存只能缓存静态页面。对于需要用户特定内容的网站,可以使用JavaScript框架来渲染用户界面,并通过REST API获取数据。
缓存清除功能
此外,NGINX 还提供了一项缓存清除功能,可以用于快速清除NGINX缓存中的特定内容。如果想缓存更长时间的内容,可以将该功能编入程序中,但一旦更改了原始内容,就要立即更新该程序。
安装Nginx ngx_cache_purge模块:
如果你用的是LNMP一键安装包,编辑lnmp安装包目录下的 lnmp.conf 文件,在Nginx_Modules_Options=” 的单引号中加上 –add-module=/root/ngx_cache_purge-2.3 保存,升级一下nginx就安装上了,其他模块也参考这个就行。
ngx_cache_purge-2.3需要你从frickle.com官网中下载安装包并解压,目前最新版是2.3。
安装Nginx Helper插件-自动刷新缓存
通过上面的方法我们已经配置好了fastcgi_cache缓存,接下来我们就要解决当Wordpress有新评论、新文章时自动刷新Nginx缓存页面了。直接搜索Nginx Helper插件下载,然后是设置,首先是开启,清除方式选择本地文件。
插件还提供了其它的一些设置,例如发表新文章、新评论时是否更新Nginx缓存。
总结
本文展示了缓存动态内容可能带来的好处以及如何使用NGINX的活动监测数据来调整和诊断缓存配置。如果想在生产环境中使用微缓存,建议创建并测试一个更复杂的缓存规则,以针对更长时间内的微缓存动态和静态内容。